This tutorial will show you how to create a small enterprise application using Butler Forms. The application is a simple application for order administration.
First you need to download and install Butler. This is done by browsing to http://butler.sourceforge.net and choosing "Download". After downloading the Butler zip-file, you should unpack the zip-file on your computer. Define an environment variable named BUTLER_HOME with the value set to the path of your Bulter directory. Now, Butler is installed.
Next you need to prepare your application. Create a directory on your computer named myapp (or whatever you want). In this directory you should create following subfolders.
    myapp
        conf
        forms
        sql
Create a file named databases.xml in the conf folder with following content:
<databases>
    <database alias="default">
        <driver>org.hsqldb.jdbcDriver</driver>
        <url>jdbc:hsqldb:sql/mydb</url>
        <user>sa</user>
        <catalog name="default">
            <schema name="default" descriptor="sql/schema.xml"/>
        </catalog>
    </database>
</databases>
Now, you will create the tables for your application. Create a file named schema.xml in the sql folder and open the file in a text editor and create a root element with the name "schema".
The application will have a number of tables, we will start with a single table representing customers. Put following element inside the schema element.
    <table name="Customers">
        <column name="CustomerID" pk="true" type="VARCHAR" size="5"/>
        <column name="CompanyName" type="VARCHAR" size="40"/>
        <column name="ContactName" type="VARCHAR" size="30"/>
    </table>
Initially, you will create the simpliest possible client application for viewing and editing customer. Create a file named customers-listform.xml in the forms folder with this content.
<list-form table="Customers"/>
The first version of your application is now ready. To do this, open a command line window, change directory to the directory for your application and enter this command:
%BUTLER_HOME%/bin/run-form.bat forms/customers-listform.xml
When you start the application, a frame like below will appear.

The search panel is autogenerated based on the primary key (CustomerID). The spread below shows all records that match the search criteria. Now you can press the "New" button and create a customer. When you are done, press the save button.
Next, you will change the search panel. The user might want to be able to also use CompanyName for searching customers. To enable this, change the list-form element in customers-listform.xml to this.
    <list-form table="Customers">
        <query>
            <and-filter>
                <like-filter column="CustomerID"/>
                <like-filter column="CompanyName"/>
            </and-filter>
        </query>
    </list-form>
Now, your client form will look like this:

So far, your application only handles one single table. Next, you should create the rest of the tables in the application. Edit schema.xml and add following content in the root element (schema).
    <table name="Products">
        <column name="ProductID" pk="true" type="INTEGER"/>
        <column name="ProductName" type="VARCHAR" size="40"/>
        <column name="UnitPrice" pk="false" type="NUMERIC" size="10" decimals="2"/>
        <column name="UnitsInStock" type="NUMERIC" size="5"/>
        <column name="UnitsOnOrder" type="NUMERIC" size="5"/>
    </table>

    <table name="Orders">
        <column name="OrderID" pk="true" type="INTEGER"/>
        <column name="OrderDate" type="DATE"/>
        <foreign-key name="FK_Orders_Customers" pktable="Customers"/>
        <foreign-key name="FK_Orders_Employees" pktable="Employees"/>
    </table>

    <table name="Order Details">
        <column name="OrderID" pk="true" type="INTEGER"/>
        <column name="ProductID" pk="true" type="INTEGER"/>
        <column name="UnitPrice" type="NUMERIC" size="10" decimals="2"/>
        <column name="Quantity" type="INTEGER"/>
        <foreign-key name="FK_OrderDetails_Orders" pktable="Orders">
            <column name="OrderID"/>
        </foreign-key>
        <foreign-key name="FK_OrderDetails_Products" pktable="Products">
            <column name="ProductID"/>
        </foreign-key>
    </table>
Next time the application starts, these new tables will be created in the database.
Copy your customers-listform.xml to a file named multipleform.xml and open this file in a text editor. Create a new root element named "multiple-form" and put the previous content inside this element. Now put this additional elements in the root element.
    <list-form table="Products">
        <query>
            <and-filter>
            	<like-filter column="ProductID"/>
            	<like-filter column="ProductName"/>
            </and-filter>
        </query>
    </list-form>
You can start the application with the following command at the command prompt.
%BUTLER_HOME%/bin/run-form.bat forms/multipleform.xml
Now, you have two client forms for viewing and editing data about customers, and products. The user can choose between these forms using the "Window" menu. Next you will create a little bit more complicated form for orders. Start with creating a simple list form for orders.
<list-form table="Orders"/>
In this spreadsheet in this form, the user can type customer id for the order. A better way would be to be able to choose customers from a combo box. To do this, put following element inside the list-form element for "Orders".
    <record-list-table>
        <column name="OrderID"/>
        <column name="OrderDate"/>
        <column fk="FK_Orders_Customers" column="CompanyName"/>
    </record-list-table>
Now, the order speadsheet will show the value for "CompanyName" for the related customer, not the customer id.

Next step is to change the search panel for orders. The user should be able to search orders that belong to a given customer. To do this, add following element in the list-form element for "Orders".
    <query-panel>
        <and-filter>
            <like-filter column="OrderID"/>
            <fk-filter-panel fk="FK_Orders_Customers">
                 <combo-record-selector column="CompanyName"/>
            </fk-filter-panel>
        </and-filter>
    </query-panel>

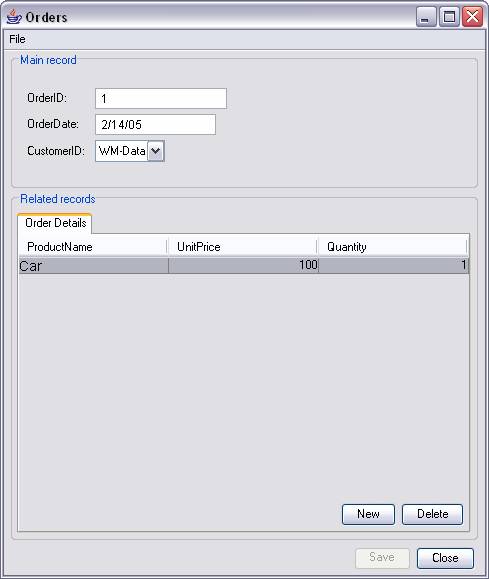
For orders, it is more convinient to edit order data in a detail form instead of inside the spreadsheet. When a single order row is double-clicked, a detail form should popup. This is done by adding a detail-form element in the list-form element for "Orders".
<detail-form/>
Like the order spreadsheet, the user should be able to choose valid customers from a combo box. To do this, following content should be put inside the detail-form element.
    <record-editor>
        <column name="OrderID"/>
        <column name="OrderDate"/>
	    <column fk="FK_Orders_Customers" column="CompanyName"/>
    </record-editor>

In the order detail form, the user should also be able to view and edit details rows. Add following code in the detail-form element.
    <related-tabbed-pane>
        <record-list-table table="Order Details">
            <column name="ProductID"/>
            <column name="UnitPrice"/>
            <column name="Quantity"/>
        </record-list-table>
    </related-tabbed-pane>
Finnally the user should be able to select the product from a combo box. Replace the column element for "ProductID" with this element.
<column fk="FK_OrderDetails_Products" column="ProductName"/>